
Cheesecake

Crust
- 10 (120g) graham crackers, finely ground
- 3 – 4 tablespoons (42g – 56g) unsalted butter, melted
- A pinch sea salt
- 2 teaspoons – 1 1/2 tablespoon (8.3g – 19g) brown sugar (depending on your desired sweetness)
- Optional: ¼ cup (32g) all-purpose flour (For blind-bake crust)
Cheesecake Batter (7 inches x 3 inches)
- 16 ounces (454g) Philadelphia cream cheese, room temperature
- 2 large eggs, room temperature
- 2/3 cup (133g) white sugar
- 1/2 cup (120g) sour cream, room temperature
- 2 tablespoons (16g) cornstarch
- 2 teaspoons (10ml) vanilla extract
- 2 pinches sea salt
NOTES FOR OTHER FLAVORS: Replace vanilla with Key Lime Juice, Cold Brew Coffee Concentrate, or your favorite liquor. Or consider replacing sour cream with pumpkin puree and adding pumpkin pie spice as well. Also consider adding mixins to the batter including your favorite candy or using crushed Oreos for the crust.
PREPARATION
16 ounces (454g) Philadelphia cream cheese
2 large eggs
½ cup (120g) sour cream
3 – 4 tablespoons (42g – 56g) unsalted butter
2 large eggs
½ cup (120g) sour cream
3 – 4 tablespoons (42g – 56g) unsalted butter
Place cream cheese, eggs, sour cream on counter-top to reach room temperature.
Then, melt the unsalted butter.
*Critical Tip: this is critical for your cheesecake’s success, so please please make sure all the above ingredients are at room temperature before you start. If not, you may end up with lumpy fluff top cheesecake. So don’t skip this step! 🙂
PART A
MAKE THE CRUST
1
Ground Graham Crackers
10 (120g) graham crackers- You can also buy them already crushed on the baking aisle at PublixFood processor or Ziploc bag + Rolling pin
Finely ground the graham crackers in a food processor.
Or place the graham crackers in a Ziploc bag and roll them with a rolling pin.

2
Mix Crust Mixture
Finely ground graham crackers
A pinch sea salt
2 tsp – 1½ tbsp (8.3g – 19g) brown sugar
A pinch sea salt
2 tsp – 1½ tbsp (8.3g – 19g) brown sugar
Small mixing bowl
Fork
Fork
In a small mixing bowl, mix finely ground graham crackers, sea salt, brown sugar together with a fork.
*Pro Tip: Why add sea salt? A small pinch of sea salt heightens the flavor of other ingredients. A secret ingredient in many restaurant-quality desserts. shh… 😉
3
Optional – Add Flour
¼ cup (32g) all-purpose flour. I do this.
If you want a firmer & crisper crust, we recommend blind-baking the crust. We’ll discuss this in Step 7 below.
If you’re blind-baking your crust, mix in the flour at this step.
4
Mix in Melted Unsalted Butter
3 – 4 tbsp (42g – 56g) unsalted butter, melted
Mix in unsalted butter until the mixture sticks together.
5
Line Pan
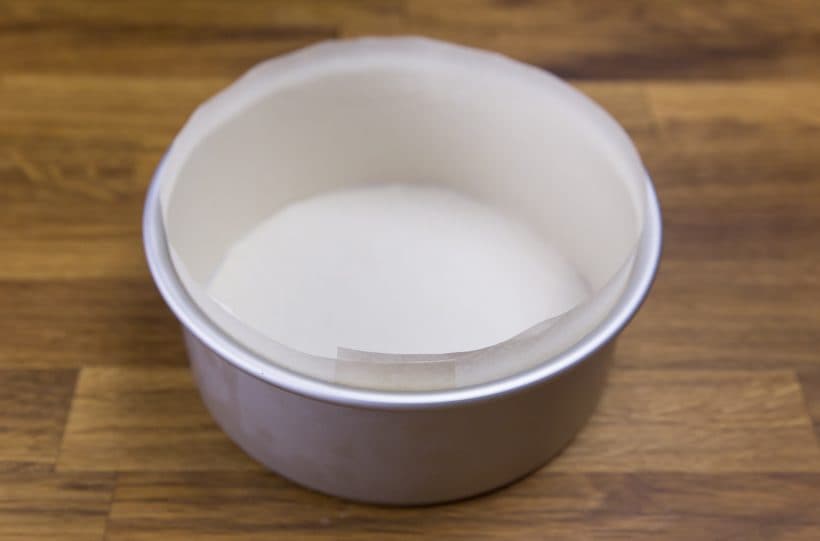
Line the side & bottom of the cheesecake pan with parchment paper for smoother sides & easier release.
*Note: We did not use any butter to line the parchment paper.
6
Form Crust
Graham cracker crumbs mixture, from above
Measuring cup/Spoon
Measuring cup/Spoon
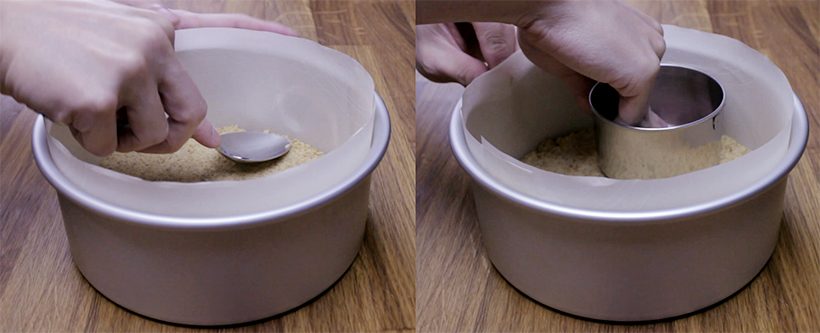
Pour in the graham cracker crumbs mixture.
Gently press down the crumbs with a flat measuring cup, ramekin or Mason jar to form an even layer. You can also use a spoon for the edges.
7
Firm Crust
In our blind taste test, the Method #2: Blind-Baked Crust was noticeably firmer and crisper compared to Method #1’s freezer version.
Method #1 – Freeze the Crust: Place the cheesecake pan in the freezer while you make the cheesecake batter.
Method #2 – Blind-Bake the Crust (for firmer & crisper crust): Place the crust in a 325°F oven for 15 minutes. I like this method better.
PART B
MAKE CHEESECAKE BATTER
*Critical Tip: We highly recommend using a Hand Mixer instead of a Stand Mixer. Stand Mixer is usually more powerful, thus you can easily overmix and introduce too much air into the cheesecake batter. This may result in a puffy souffle-style cheesecake.
Creamy Cheesecake Batter
8
Mix Sugar Mixture
2 tbsp (16g) cornstarch
2 pinches of sea salt
⅔ cup (133g) white sugar
Small mixing bowl
2 pinches of sea salt
⅔ cup (133g) white sugar
Small mixing bowl
Mix cornstarch, sea salt, and white sugar together in a small mixing bowl.
9
Briefly Beat Cream Cheese
16 ounces (454g) Philadelphia cream cheese
Medium mixing bowl
Hand mixer
Medium mixing bowl
Hand mixer
In a medium mixing bowl, beat the cream cheese for 1 minute with a hand mixer using low speed.
10
Mix in Sugar Mixture
Sugar mixture
Hand mixer
Silicone spatula
Hand mixer
Silicone spatula
Add in half the sugar mixture and beat for 1 minute with a hand mixer using low speed.
Scrape down the sides and the hand mixer with a silicone spatula every time a new ingredient is added.
Then, add remaining sugar mixture and beat for another 1 minute using low speed.
11
Add Sour Cream & Vanilla Extract
½ cup (120g) sour cream
2 tsp (10 ml) vanilla extract
Cream cheese mixture
Hand mixer
2 tsp (10 ml) vanilla extract
Cream cheese mixture
Hand mixer
Add sour cream and vanilla extract to the cream cheese mixture.
Beat the cheesecake batter for 1 minute with a hand mixer using low speed.
12
Blend in Eggs
2 large eggs
Hand Mixer
Silicone spatula
Hand Mixer
Silicone spatula
Blend in the two eggs using low speed, one at a time. Mix until just incorporated (about 15 – 20 seconds with a hand mixer). Try not to overmix on this step.
Scrape down the sides and the hand mixer with a silicone spatula and fold a few times to make sure everything is fully incorporated.
13
Pour Batter in Pan
Cream cheese batter
Cheesecake pan
Cheesecake pan
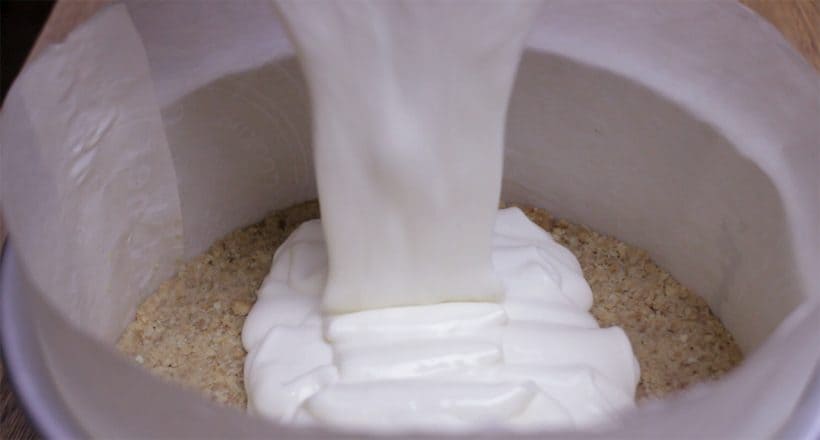
Pour cream cheese batter into the cheesecake pan.
14
Remove Air Bubbles for Smooth Surface
Tap cheesecake pan against the counter to let the air bubbles rise to the surface.
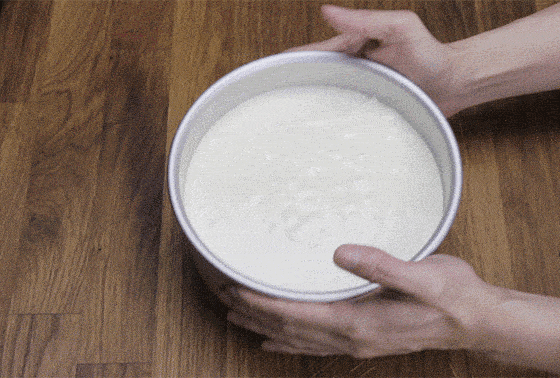
Burst the air bubbles with a toothpick or fork.
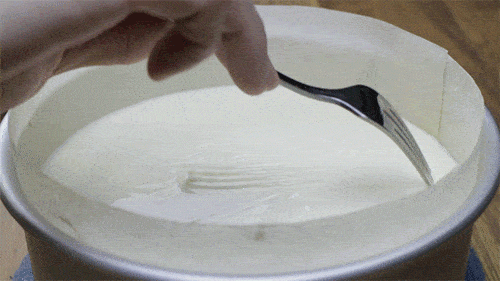
The longer you tap, the more air bubbles you’ll be able to burst.
Removing air bubbles is an art that requires patience!
Tap until you are satisfied. Ensure the surface is clear of air bubbles or fork marks.
Side note: what we learned from our 16 17 experiments, it’s almost impossible to remove all air bubbles.
PART C
PRESSURE COOK CHEESECAKE
To make it easier to take out the cheesecake pan from Instant Pot: make a foil sling by folding a piece of aluminium foil (as shown below).
*Note: Be sure to tuck in the foil sling down the sides (don’t let it fold over the cake when you close the lid).
Perfectionist Method #2
This Perfectionist Method takes an extra step to further prevent surface dents on the cheesecake.
Cause of Surface Dents: Dents on cheesecake’s surface is mostly caused by the condensation build-up during the “going up to pressure” stage.
Why Use This Method? By starting with boiling water, we can shorten the “going up to pressure” time in order to minimize condensation.
15
Pressure Cook Cheesecake
CONVENTIONAL OVEN METHOD: Can also be cooked in a 10" pan in the oven on convection at 325 degrees. Place filled pan on full baking sheet and fill sheet with water. Takes 45 minutes. Remove and cool on rack. Place in refrigerator.
1 cup (250 ml) of water
Steamer rack
Foil sling
Instant Pot Pressure Cooker
Steamer rack
Foil sling
Instant Pot Pressure Cooker
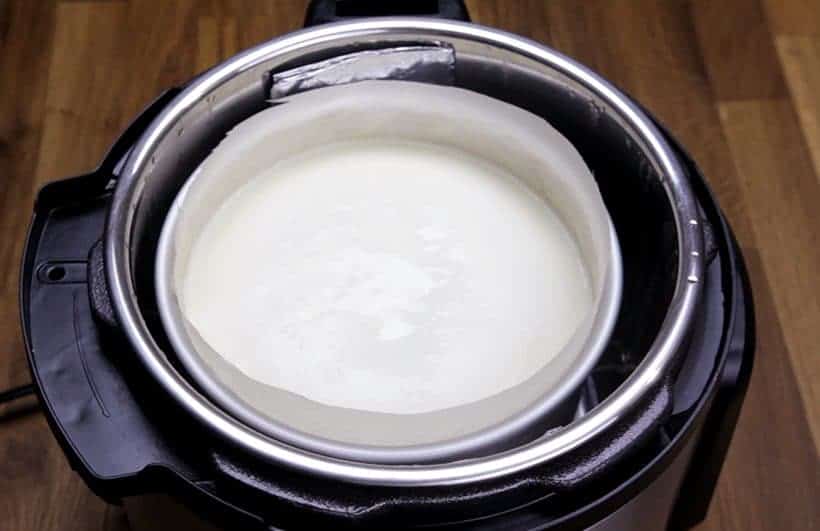
Place a steamer rack and pour water in pressure cooker. Bring water to a boil (Instant Pot users: Press manual/pressure cook and set the time to 28 minutes).
When the water begins to boil, place cheesecake pan on the steamer rack with a foil sling right away.
*Caution: Don’t wait too long to place the cheesecake in pressure cooker, as it’ll affect the cooking time. Place it immediately once the water begins to boil. This prevents too much water from evaporating.
Immediately close the lid with the Venting Knob at Venting Position.
Turn Venting Knob to Sealing Position and let it pressure cook. It should go up to pressure in ~1 minute.
- Pressure Cooking Time: High Pressure for 28 minutes, then Full Natural Release (takes roughly 7 – 9 minutes)
Open the lid gradually.
*Pro Tip 1 – For 6 x 3 inches Cheesecake Pan: add 5 mins High Pressure Pressure Cooking Time.
*Pro Tip 2: As you open the lid, try your best to avoid dripping the condensation from the lid onto the cheesecake.
Absorb any condensation on the surface by lightly tapping it with a soft paper towel.
PART D
COOL, CHILL, SERVE CHEESECAKE
16
Cool Cheesecake
Allow cheesecake to cool to room temperature with the lid open in the Instant Pot Pressure Cooker.
Or place it on a wire rack to cool to room temperature.
17
Release Cheesecake From Sidewall
After cooling for 10 – 15 minutes, carefully run a thin paring knife between the sidewall and the cheesecake (or parchment paper) to release the cheesecake from the pan.
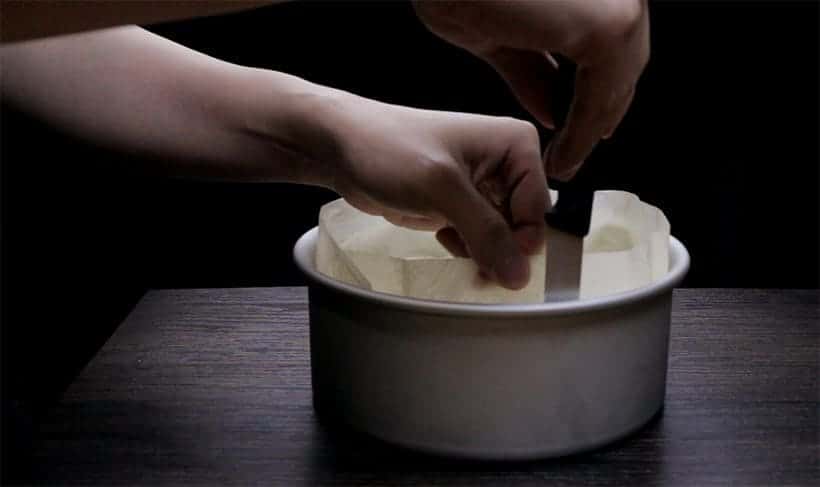
The parchment paper will wrinkle after pressure cooking. Pull it lightly to straighten it out for a smooth side.
18
Chill Cheesecake in Fridge
Once the cheesecake has completely cooled, place it in the refrigerator for at least 4 – 8 hours (preferably overnight).
19
Serve Instant Pot Cheesecake #17
Remove the cheesecake from the refrigerator!
The best way to release the cheesecake from the bottom pan is warm bottom of the pan to melt the butter. You can use a torch or heating pad for this step.
Carefully peel off the parchment paper.
You’ve done it!! Your very own Instant Pot Cheesecake #17.
Give yourself a pat on the back & EAT!! 😀
Cooking Tips for Instant Pot Cheesecake
1. Ensure Cream Cheese, Eggs, Sour Cream at Room Temperature
Placing the above ingredients on the counter ahead of time until it reaches room temperature is critical to your cheesecake’s success! Please ensure they’re not cold before you begin making your stunning New York Cheesecake #17!
2. Smooth & Creamy Cheesecake Option:
Adjust the beating time to 1 minute for Part B – Step 9 (cream cheese), Step 10 (sugar mixture), and Step 11 (sour cream & vanilla extract).
3. Add Lemon Juice to Cheesecake Batter?
We tried using fresh Sour Cream and old Sour Cream. Old sour cream has lost some of the tangy flavors, so adding 1 tablespoon of lemon juice will help balance the flavors. Add it in Part B – Step 11 with the sour cream.
But if your sour cream is fresh, no lemon juice is needed unless you like extra tangy flavor. 🙂
4. Modifications For Other Sizes of Cheesecake Pan?
You can use the same recipe with adjusted pressure cooking time.
- 6 x 3 inches Cheesecake Pan (Uncovered): Due to the increase in thickness, add 5 mins High Pressure Pressure Cooking Time
- 4.5 – 5 x 2 inches Cheesecake Pan (Uncovered): High Pressure 18 minutes + Natural Release
- Standard silicone cup (2.7″ x 1.25″) cheesecake bites (uncovered): High Pressure 7 minutes + Natural Release
5. Can I Wrap My Cheesecake with Aluminum Foil?
Some users like to wrap their cheesecake with aluminum foil for pressure cooking, but it’s not necessary. If you do decide to wrap the pan with aluminum foil, add additional 5 – 7 mins to our stated pressure cooking time in this recipe.
6. Use Hand Mixer Rather than Stand Mixer
We highly recommend using a Hand Mixer over a Stand Mixer to mix the cheesecake batter. Since Stand Mixers are usually more powerful, you can easily overmix and introduce too much air into the cheesecake batter. This may result in a puffy souffle-style cheesecake.


Comments